LCD or Liquid Crystal Display is a display media based on liquid crystals as the main viewer object. LCDs are widely used for various purposes such as calculators, televisions, or computer screens. The LCD used in this tutorial is LCD 2004. This kind of LCD has 4 rows and 20 columns. To be more clear about the column and row look at the picture below

To display characters on LCD 20×4 connected to the I2C module, it is important to adjust the columns and rows so that the characters can be displayed according to the program. To set the column and row display on the LCD, the instruction “lcd.setCursor() ;” is used. For example, if we command “lcd.setCursor(3,1);” then the characters will be displayed in column 3 row 1. If you wanna print the characters you must use “lcd.print()” instruction, for example, if you command “lcd.print(“test”);” then the LCD will display the word “test” For more details, let’s do this simple experiment but first we need to prepare:
Tools and Materials
- Arduino Uno.
- 20×4 LCD with I2C module installed.
- Jumper cables as needed.
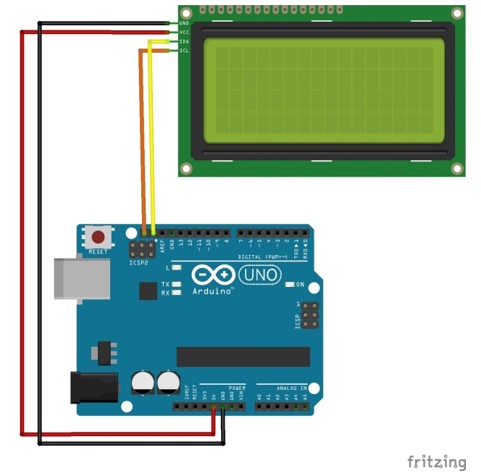
Then make a circuit like in the picture below with the pin configuration:
• VCC connected to 5v Arduino Uno.
• GND is connected to GND Arduino Uno.
• SCL is connected to Arduino pin A5.
• SDA is connected to Arduino pin A4.

First, you need to install a library to handle communication with LCD. For this moment we will use LiquidCrystal_I2C.h.h library. You can download it at this link. Next, open your Arduino IDE (can be downloaded at Arduino.cc), and copy the program listing as follows:
1.	#include <Wire.h>
2.	#include <LiquidCrystal_I2C.h>
3.	LiquidCrystal_I2C lcd(0x27, 20, 4); // 0x27 is I2C module address
4.
5.	void setup()
6.	{
7.	  lcd.init();
8.	  lcd.begin(20,4);
9.	  lcd.backlight();
10.	}
11.	void loop()
12.	{
13.	  lcd.setCursor(5, 0);
14.	  lcd.print("Welcome to");
15.	  lcd.setCursor(5, 1);
16.	  lcd.print("saptaji.com");
17.	  lcd.setCursor(2, 2);
18.	  lcd.print(" ");
19.	  delay(2000);
20.	  lcd.clear();
21.	  lcd.setCursor(1, 0);
22.	  lcd.print("LCD 2004 Tutorial");
23.	  lcd.setCursor(5, 1);
24.	  lcd.print("using I2C module");
25.	  lcd.setCursor(0, 2);
26.	  lcd.print("and Arduino");
27.	  lcd.setCursor(8, 3);
28.	  lcd.print("Uno");
29.	  delay(2000);
30.	  lcd.clear();
31.	}
Upload the sketch by pressing the upload button or via the hotkey CTRL+U, then after successfully uploading, try to check the characters displayed on your LCD.
If your LCD 2004 displays characters like the picture above, then your experiment has been successful. You can change the character display on the 20×4 LCD according to your needs. Cheers …
a Technopreneur – writer – Enthusiastic about learning AI, IoT, Robotics, Raspberry Pi, Arduino, ESP8266, Delphi, Python, Javascript, PHP, etc. Founder of startup Indomaker.com
